Thanks for visiting my blog!

It was a Sunday afternoon and I wanted to play with some of the new features of .NET 5 and learn something. I had a small irritation with bit.ly. When I customized a short-URL, I could never go back and update the link. That was enough for me to want to make something.
I also had a couple of things I wanted to learn, so two birds…one stone:
- Use VS Code for C# project from scratch.
- Play with C# 9’s top-level statements.
- Use Cosmos’s Table storage.
- Do something simple without invoking MVC, Razor Pages or anything.
First thing I did was start a new .NET Core project from the command-line:
> dotnet new webOpening up Visual Studio Code told me I had the minimal ASP.NET Core project. I deleted the Startup.cs entirely. I opened up the Program.cs and deleted everything again. I started with the basics:
Host.CreateDefaultBuilder(args)
  .ConfigureWebHostDefaults()
  .Start();
I had to add a using statement, but now I had a completely active project (though it didn’t do anything but return 404’s):
using Microsoft.AspNetCore.Hosting;

Host.CreateDefaultBuilder(args)
  .ConfigureWebHostDefaults()
  .Start();
I created a simple class called LinkManager to deal with the actual work. But to get it to work, I had to configure much of what I would normally do in Startup.cs by hand (this isn’t what you should do, just what I did):
Host.CreateDefaultBuilder(args)
  .ConfigureWebHostDefaults(bldr =>
  {

    bldr.ConfigureServices(svc =>
    {
      svc.AddTransient<LinkManager>();
    });

    bldr.Configure(app =>
    {
      app.Run(async context =>
        {
          var manager = app.ApplicationServices.GetService<LinkManager>();
          await manager.HandleRedirection(context);
        });
    });

  })
  .Start();
For something this small, this was nice. I have to say at this point, Visual Studio Code was doing really well with the project. I had zero reasons to go to Visual Studio, but we’ll get there soon…
Inside the HandleRedirection, I search to see if the path requested is a valid redirection and if so I just setup the redirection:
public async Task HandleRedirection(HttpContext ctx)
{
  try
  {
    var redirect = await FindRedirect(ctx.Request.Path);
    if (redirect is not null)
    {
      ctx.Response.Redirect(redirect);
      return;
    }
  }
  catch (Exception ex)
  {
    _logger.LogError("Exception during finding short link", ex);
  }
}
I hated the idea of a failed link just returning 404 or 500. So to deal with this I decided I need a web page. But what to do? Do I need to introduce Razor Pages or MVC (or other framework)?
Instead I just decided to serve up the page:
ctx.Response.ContentType = "text/html";
var page = await File.ReadAllTextAsync(
  Path.Combine(_env.ContentRootPath, "index.html"));
await ctx.Response.WriteAsync(page);
Since I was just serving up a single page, this was fine. No dynamic code here. I could have redirected to the index.html page, but instead I just served it up so that the URL would be preserved. One note was that I was using a local css file. So to deal with that I just opted into StaticFiles:
bldr.Configure(app =>
{
  app.UseStaticFiles();

  app.Run(async context =>
    {
      var manager = app.ApplicationServices.GetService<LinkManager>();
      await manager.HandleRedirection(context);
    });
});
Easy peazy!
Last thing is to use Cosmos Table Storage. I won’t go into details of how I set it up, but the core of the code (once it’s setup) is just to retrieve a particular row based on the key. The table just has the short-url and the final destination:
var op = TableOperation.Retrieve<LinkEntity>(PARTITIONKEY, key);
var result = await _table.ExecuteAsync(op);
var link = result.Result as LinkEntity;
if (link != null)
{
  if (linkCache is null) linkCache = new Dictionary<string, string>();
  linkCache[key] = link.Link;
  _cache.Set(LINKCACHE, linkCache, DateTimeOffset.Now.AddMinutes(60));

  _logger.LogInformation("Added Key to Cache");

  return link.Link;
}
Feel free to look at the code to see how I actually connect to Cosmos, it’s pretty simple stuff.
The last piece was to deal with deploying it into Azure. I covered this in depth in my short series here, but the only thing interesting in the process was that I needed to create a Docker image to deploy.
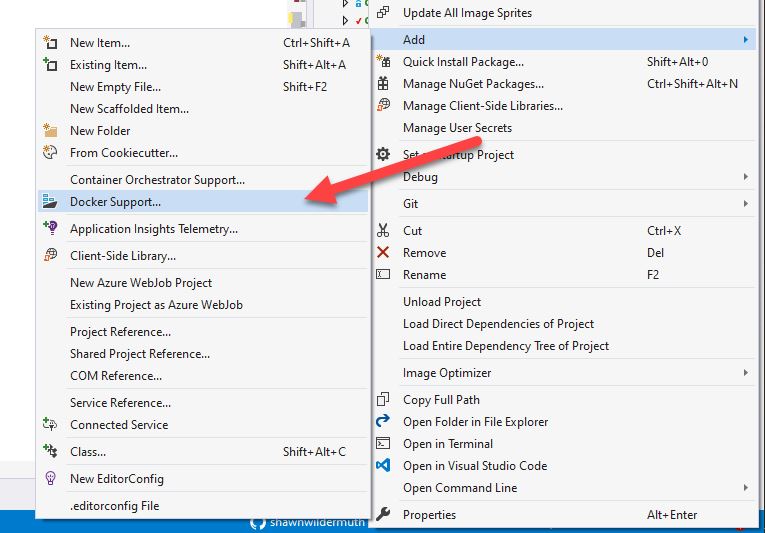
I could have just added a Dockerfile and hand coded it but I’m lazy. This was the moment I opened the project back in Visual Studio so I could use the amazingly easy “Docker Support” to create an image:

With that in place, it was just a matter of setting up the Azure magic and it was live!
Be aware, I’m lazy. So I’m manually adding entries using Azure tooling (Azure Storage Explorer or the Portal) so the code doesn’t have the admin functionality at all. As I’d need to deal with security and multiple forms, I might have to deal with that eventually, but for now I can take the lazy approach.
You can try it out here:
If you’re curious, the code is at:
Yeah, I probably should have used my new shortener on that one.
