Thanks for visiting my blog!

This is the eighth of ten parts of this blog post. The topics will be:
- 1: A New World
- 2: Architecting JavaScript
- 3: A Better CSS
- 4: Debugging
- 5: Joy and Pain of jQuery Plugins
- 6: Packaging Assets
- 7: Distributed Version Control
- 8: Working with Facebook (this article)
- 9: Mobile Pages
- 10: Deploying to the Cloud (upcoming)
Oh Facebook…how do you becoming so insistent on integrating you into every website? Well anyway, let’s show you how it actually works. In this post, I’ll show you how to authenticate an app using Facebook.
Getting Started
When you want to integrate with Facebook, you’ll need the Facebook SDK. Unlike other JavaScript APIs, the Facebook API isn’t a download. The API has some specific peculiar patterns that it requires. But if you obey Facebook, it will (usually) bend to your will. To get started you’ll want to visit the Facebook developer site:
https://developers.facebook.com
Before you get started using the Facebook API, you need to have a Facebook application. This is simply registering with Facebook to get a unique key for your use of the API. To do this, you will want to click on the Apps button (or go to https://developers.facebook.com/apps) and choose “New App”:

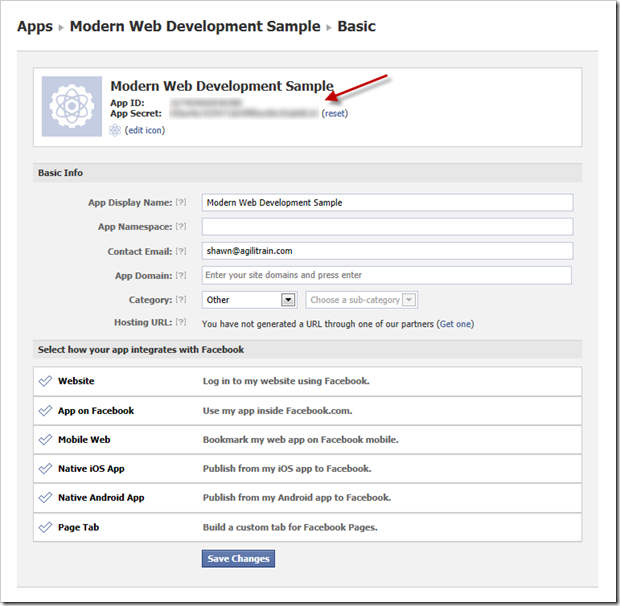
This will create a new application and take you to your application page:
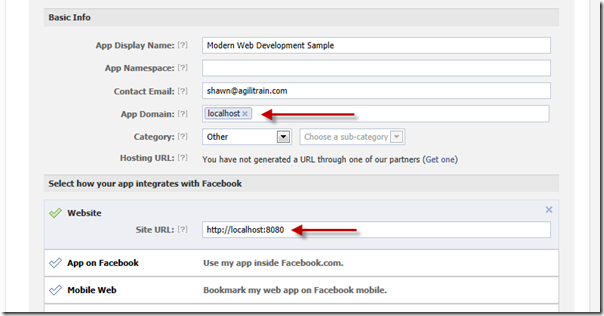
The App ID and App Secret are the magic numbers you’ll need (as shown by the arrows). The only other part of this process that is important is the “App Domain” specified here. The Facebook API only works (with the App ID and App Secret) from a specific domain and website address. For development I suggest you set this to your localhost address (yes, this works fine). For example:
On the App page this will look like:
This works for a new project, but once you deploy to a live site you no longer can test your development application as you’ll need to change this to the live site’s domain. To address this, I suggest you create two applications – a development application and the application for your deployed application.
NOTE: If you are using Internet Explorer for development, the Facebook SDK doesn’t work on non-standard ports. You should either pick port 80 (or 443) or use another browser for your Facebook work.
So let’s start loading the SDK.
Loading the SDK
Now that you have your application, you can start using the SDK. The Facebook SDK requires you download the .js file, have an element in your HTML that the SDK uses as well as have an initialization method. So first you’ll need an element (usually a DIV) named “fb-root”:
<!-- The required element that the Facebook SDK uses -->
<div id="fb-root"></div>
```csharp
It doesn’t matter where the element is in your design, I usually just place it right above my script tags at the bottom of the <body/> tag. It will not be visible to your users.
The Facebook SDK exposes all of it’s functionality (pun intended) on global object called “FB”. Before you can use the SDK you will need to initialize this object to include information like your App ID (and other options). This is usually called in a function that is called by the SDK when it is loaded on your page:
```xml
<script type="text/javascript">
window.fbAsyncInit = function () {
FB.init({
appId: '@ConfigurationManager.AppSettings["facebookAppId"]',
cookie: true,
status: true,
frictionless: true,
xfbml: true
});
};
</script>This function must be added to the ‘window’ object and be called ‘fbAsyncInit’. In the method you should call the init method of the FB object to specify several pieces of information. Note that I am calling this in a Razor page so I can using the @ syntax to load the facebookAppId from my AppSettings in my web.config file. I do this so I can have a debug application and switch it to a release AppId when I deploy it to my live servers. The other options are covered in the Facebook SDK so I won’t repeat that here.
Finally you need to load the Facebook SDK. The SDK is located at “connect.facebook.net/en_US/all.js”. But because of all the initialization that it performs, it is best not to just use a script tag. Instead they suggest you load it asynchronously like so:
// Load the SDK Asynchronously
(function (d) {
  var js, id = 'facebook-jssdk'; if (d.getElementById(id)) { return; }
  js = d.createElement('script'); js.id = id; js.async = true;
  js.src = "//connect.facebook.net/en_US/all.js";
  d.getElementsByTagName('head')[0].appendChild(js);
} (document));
This creates a new script element after the pages has loaded and loads the script. Notice the src of the script element: “//connect.facebook.net/en_US/all.js”. This URI is used so it will get it via https or http based on how your application is hosted. The workflow here is:
- Load the SDK asynchronously
- Execute the fbAsyncInit method if it exists on the window object
- FB.Init is called with the AppID (et al.)
At this point you’ve done all the work to be able to use the SDK.
Logging into Facebook
For this example, I am going to keep it simple and just show login via clicking on an image and then showing the name of the user that was logged in. So I’ve added a new image in my HTML page that I’ve specified a class called ‘fb-login’:
<img class="fb-login" src="http://wilderminds.blob.core.windows.net/img/FBLogin.png" alt="Facebook Connect" />This could be an actual button or even a link, but for my needs I just need some UI element for the users to click. Then I can just add a click handler to the image like so:
// Handle anything that can be clicked as
$('.fb-login').click(function () {
FB.login(function (response) {
if (response.authResponse) {
mwd.showCurrentUser();
}
}, { scope: 'email,user_about_me' }
});
```csharp
In this case, I am just calling the Facebook SDK’s **login** function to perform the login. The second parameter of the **login** function is an object that can be used to specify the ‘scope’. This ‘scope’ is the list of permissions. In this case, we’re just asking for permission to see the email address and the basic user information for the person. You could ask for more permissions (or more appropriately you can expand these permissions as you need them).
When the login function is called it will look for the AppID that was specified and go to Facebook.com and popup a new login dialog for you:

This dialog is shown if the user is not already logged in. If the user hasn’t used Facebook to login before it will also show a permissions dialog. If you login with \*your\* login that you created the App with, this dialog won’t appear as you’ve already approved the application since you’re the owner. But if you try and login with other users it will simply fail. Why? Because your application isn’t public yet. So either you can make it public or usually you’ll just add testers to your application instead (for early development). To add testers to your application, you can visit the application page again and pick “Roles”:

On the Roles page, you can add Developers and Testers. These must be Facebook users and they will need to approve their role before they can login. Once you do this, you will get the permissions dialog (based on the permissions you asked for in the **login** method):

This dialog will be shown only when you ask for more permissions than they’ve approved before. For example if you ask for email and user info now, but later expand that to looking at their pictures, this dialog will show asking approval again. In this way you can expand the permissions as a user uses your site without scaring them off with lots of permissions later.
The login function’s first parameter is a callback function that supplies a response of the login. If the response is true, login was successful…otherwise it fails. If you look back at my login callback you’ll see I am calling a method called **showCurrentUser** that I created. This is where we can actually use the Facebook SDK to get some data.
### Using the SDK
You’re logged in, so now you may want to get information from Facebook. The Facebook SDK supports a method called **api** that is used to get objects from the Facebook Social Graph. For this simple example, we’ll just get the users’ object so we can get their full name. The Facebook SDK has a special object identifier called “me” that represents the logged in user. SO we can just use the “me” URI to get the user object:
```js
// mwd.js
(function (m, $) {
m.showCurrentUser = function () {
FB.api("me", function (result) {
if (result.error) {
alert("Failed to read 'me' from facebook");
} else {
alert(result.name);
}
});
};
} (window.mwd = window.mwd || {}, jQuery));The FB.api call requests information from the social graph and returns an object. In this case I am just testing the result.error to see if it worked. If it did, I am just showing the name of the user. You can request more objects using a social graph ID. For example if you had permission to the users pictures you could request FB.api(“me/albums”, …) and it would return a list of the albums for the users. From which you could request the pictures in each album. I find the API very simple to use (once you have all the basics setup).
You can get a copy of the code with my sample facebook application (though you won’t be able to login into the test project as I won’t make it public). You can change it to your own Facebook Application API in the web.config file and go to town!
Questions?


