Thanks for visiting my blog!

This is the first of ten parts of this blog post. The topics will be:
- 1: A New World (This post)
- 2: Architecting JavaScript
- 3: A Better CSS
- 4: Debugging
- 5: Joy and Pain of jQuery Plugins
- 6: Packaging Assets
- 7: Distributed Version Control
- 8: Working with Facebook
- 9: Mobile Pages
- 10: Deploying to the Cloud (upcoming)
In the past year I’ve had a side project. FirstInked’s Beta recently shipped and I wanted to share with you what I’ve learned. To start out, I want to specifically thank two people who were really great in helping me formulate the strategies I’ll talk about. They are:
- Dave Ward (@encosia) answered every twitter pleading with great advice.
- Chris Rauber (@chrisrauber) was instrumental in doing the initial groundwork on the web project.
Where I Came From
I am not new to website development, but with most of my work taking me into the RIA space five years ago, a lot had changed in the interim. Back 10 years ago, much of the web code I saw and wrote looked a lot like this (and no, my blog code doesn’t look like this):
<html>
<head>
  <script type="text/javascript">
    function onInit() {
      var obj = document.getElementById("foo");
      foo.display = "block";
    }
  </script>
<head>
<body onload="onInit()">
  <div id="foo" style="display: none" height="100px">
    <font size="3" color="red">Hello World</font>
</div>
</body>
The mixing of the code, markup and styling was the de facto style back then but that doesn’t mean it was a good idea. It was easier with ASP.NET (classic) to do things this way. I relied a lot more on post-backs than client-side code which wasn’t the best experience for users. Something had to give.
What Has Changed?
While I’ve dabbled in Routing and MVC for the server-side code, I hadn’t gotten knee deep into the client-side richness now possible with the likes of jQuery and CSS3. ASP.NET MVC 3 has a lot to offer the web developer, but for this article series I am going to focus in on the client-side story since that is where most of the big changes are (at least in my eyes). I found that in building FirstInked that I spent about 20% of my time on the server code and the other 80% on the client code. This number is undoubtedly skewed by the fact that I am super comfortable with the server code and was learning the client code. But I think those numbers indicate a larger sense of what is happening. If your site isn’t about just displaying information (e.g. just information like a news site or blog) that you will be creating a lot more client-code than back in the first generation of web applications.
An Example
To set some context, let’s take a quick example and build a simple home page using the tools I’ll be talking about.
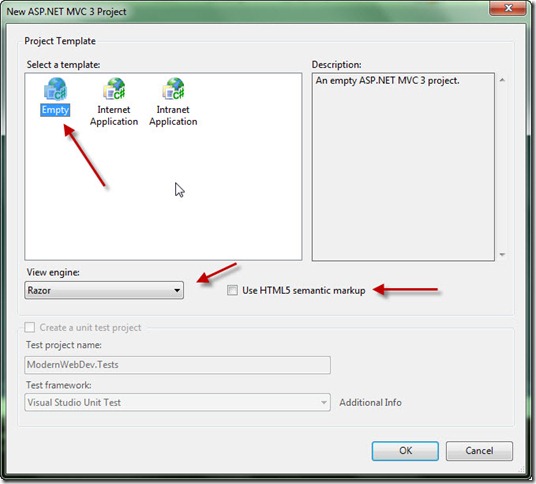
To start out, I create a new ASP.NET MVC 3 Project. This opens the “New ASP.NET MVC 3 Project” template page:
For any new development I do, I start with an empty project (though the Internet Application can be used if you want authentication and some basic start pages). I will be using Razor and HTML5 so I want to pick both the View Engine and make sure I click the “Use HTML5 semantic markup” checkbox. You can create a unit test project if you like (and you should) but I am going to skip that part for this series.
I start with a simple ASP.NET MVC 3 Empty project (for simplicity). The empty project has no controllers or views yet (though it has a _Layout…e.g. master page using HTML5). I want to clean up the project to be ready for what I want to build.
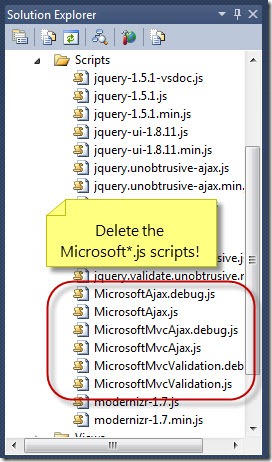
First, I look in the Scripts folder to see what scripts were added to the project by default. As I won’t be using any of the Microsoft AJAX stuff, I delete them:

I am relying completely on the jQuery stack for my development so the Microsoft scripts aren’t needed.
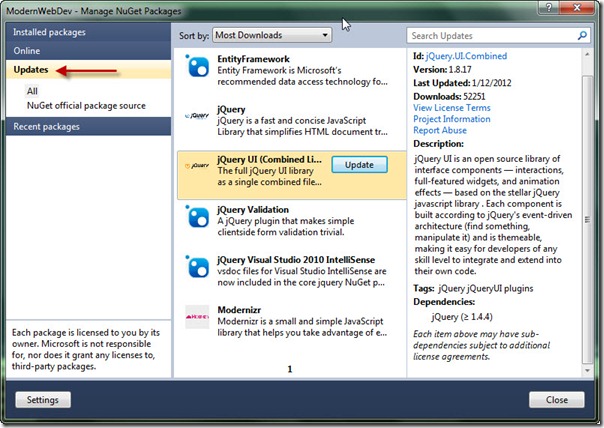
The next thing I do is upgrade the version of jQuery. The stock ASP.NET MVC 3 ships with the 1.5.1 version of jQuery but using the package manager (assuming you’re using Nuget, which if you aren’t you should be) you can just upgrade both jQuery and jQuery UI which I will use extensively. When you open the “Manage NuGet Packages” dialog, you will want to click on “Updates” to update some of the built-in packages:
I always update the JQuery UI library (since that will update the jQuery library too). You may want to update all the packages, but these are the two that are key to what we’ll talk about. Now that we’ve updated the packages, we’ll need to update the versions on the layout page:
<!DOCTYPE html>
<html>
<head>
<meta charset="utf-8" />
<title>@ViewBag.Title</title>
<link href="@Url.Content("~/Content/Site.css")"
rel="stylesheet"
type="text/css" />
<script src="@Url.Content("~/Scripts/jquery-1.7.1.min.js")"
type="text/javascript"></script>
<script src="@Url.Content("~/Scripts/modernizr-2.0.6-development.min.js")"
type="text/javascript"></script>
</head>
<body>
@RenderBody()
</body>
</html>
```csharp
Now that I have the project ready, I want to add a new controller so I right-click the controller folder and add a new Controller:
[](http://wilderminds.blob.core.windows.net/img/newcontroller_2.jpg)
For my needs I want an empty controller (as the scaffolding of a model doesn’t make sense for this simple example):

This results in a new controller file with a single result for “Index”. To create the view I need to right-click the Index method and pick AddView:

This will bring up the Add View Dialog:

I am leaving the view name so that the controller will find this view when I navigate to it. Again, I am only using Razor for my code so I leave that too. If I were using a model class, I’d use a strongly-typed view but for my needs, no model class. Finally, I want to use MVC 3’s Layout class so I leave the master page empty. This leaves us with a very simple home view razor file:
```xml
@{
ViewBag.Title = "Index";
}
<h2>Index</h2>
```csharp
I am going to focus on the client-side so I won’t put much razor syntax in this file. I have found that keeping a per-view .js and .css file for each page that requires it (not every page will require specialized styling or code, but for this example, I’ll use both). So my new razor file is:
```xml
@{
ViewBag.Title = "Index";
}
<link rel="stylesheet"
href="@Url.Content("~/Content/Home.Index.css")" />
<h2>
Index</h2>
<section id="main-section">
<div>
This is a client-side example!</div>
<button>
Click me to add some elements!</button>
</section>
<script type="text/javascript"
src="@Url.Content("~/Scripts/Home.Index.js")"></script>(For you MVC veterans, you are already thinking ahead, be patient and stop trying to fix problems…we’re going to get to it.)
This is a big part of what I want to show is that separating the concerns into structure, look and code (e.g. Markup, CSS and JavaScript).
Since I am using jQuery, my JavaScript will just add some event handlers via jQuery in the document ready handler:
$(document).ready(function () {
  $("#main-section button").on("click", function () {
    $("#main-section").append("<div>New Div</div>");
  });
});
(Again, if you’re a jQuery veteran…wait for the bigger picture in upcoming posts…promise!)
Finally, I will style the page with some CSS:
#main-section
{
  font-size: 85%;
  border: black 1px solid;
  background-color: #ddd;
  width: 85%;
  margin-left: auto;
  margin-right: auto;
}
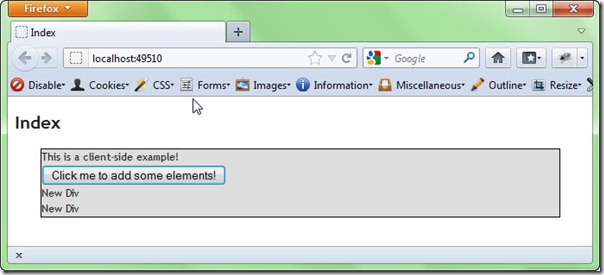
Putting this all together, we get a page that handles the mouse click and some basic styling:
You’ll notice that I named the JavaScript and the CSS based on the view and that’s mostly for discoverability while I am doing development. These scripts/stylesheets will be in addition to site-wide scripts and we’ll see later a better way of architecting this. But the general idea to take from this first part is that each view/partialview will consist of mostly these three parts:
- Markup (HTML/Razor)
- Design (CSS)
- Code (JavaScript)
My goal is to finish this series in the next couple of weeks so keep an eye on a part every 2-3 days. You can get the source for what we have so far here:


